
GPT Image 2.6 Local Editing: Recolor, Render and Export
Recolor a jacket with GPT Image 2.6 and check for face drift. Try prompts for sketch rendering, image translation and SVG icons.
GPT Image 2.6
Start with a clear brief. Check the selected model and credits before generating.
Open the workspaceOn this page
- Pick the route by what you have to deliver
- 1. Change the jacket color and protect the face
- Can I draw a red circle around the target?
- What to do when the second edit changes the face
- 2. Render a sketch and keep the composition
- 3. Use a generated UI image to discuss layout
- 4. Translate image text while keeping the diagram readable
- 5. Make a new SVG icon from a text brief
- Diagnose the next change
- FAQ
- Can GPT Image 2.6 change clothes without changing a face?
- Can I use an AI-generated UI mockup as a working prototype?
- Can I upload a reference and export it as SVG here?
- Can I make the edited picture move afterward?
Imagine a jacket that comes back in the right shade of blue but with a different bridge on the glasses. The color swatch alone will miss that change. For a useful edit, decide where the change belongs and what you will compare with the original.
This guide starts with one jacket recolor and uses the same review method for a rough sketch, an interface reference and a translated diagram. It finishes with a separate task: making a simple SVG icon from text.
Pick the route by what you have to deliver
Open the GPT Image 2.6 workspace. Use Edit Image when a source image contains details you need to carry forward. Use Text to Image for a new design. Choose PNG for a raster draft or SVG for a new vector concept.
| Brief | Start with | Review in the result |
|---|---|---|
| Recolor a jacket or a prop | Source photo and one named change, PNG | Face, fabric, edges and background |
| Render a sketch | Clear line sketch and material brief, PNG | Viewpoint, object positions and proportions |
| Design a mobile screen | A short list of required content and a wireframe if available, PNG | Hierarchy, reading order and feasible states |
| Translate labels in a diagram | Clean image plus approved wording, PNG | Text, units, arrows and label placement |
| Create a new icon | Text brief with a simple shape, SVG | Paths, viewBox, scaling and editability |
Keep the source, prompt and accepted output together. If a later revision drifts, you can go back to a clean source. The main GPT Image 2.6 tutorial has the full settings overview.
1. Change the jacket color and protect the face
Start with a portrait where the garment is clearly separated from the skin and background. In this example the olive jacket has a visible collar, pocket and zipper. The glasses and curls give you landmarks outside the edit area.
Open the clean reference portrait. Choose Edit Image, attach it as the first reference and use PNG. Try Flare, Medium quality, 1K and one output. Match the portrait's 2:3 ratio if the destination needs the same framing. Check the credit total before generating.
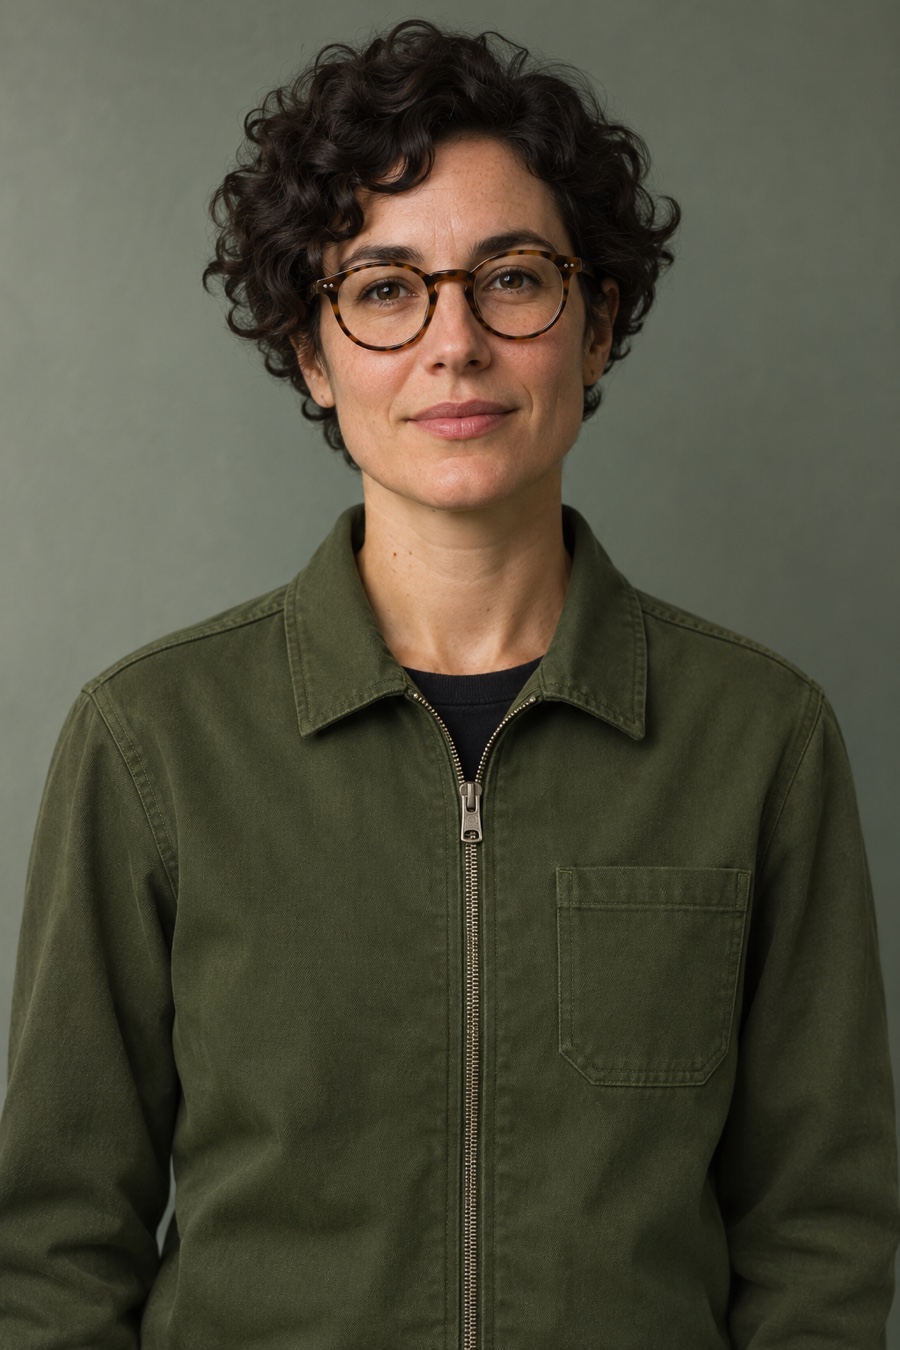
Edit @Image1. Recolor only the olive jacket fabric to muted cobalt blue.
Keep the weave, collar, zipper, seams, pocket, folds and fit.
Keep the person's face, round glasses, hair, skin tone, expression, pose, black shirt and gray-green wall.
Keep the original light and portrait framing. Add no text or accessories.
Illustrative before-and-after pair prepared with ImageGen to show what to compare. It is not a GPT Image 2.6 test result.
Compare the collar first. It sits close to the neck and chin, where color bleed can alter skin or shadows. Then look at the glasses bridge, hair edge and zipper. The blue should sit on the fabric. If the face changes visibly, reject the version even if the new color looks good.
A good edit request has three pieces: the target, the change, and the protected details. “Make the jacket more stylish” leaves all three open. “Recolor the olive fabric to muted cobalt blue and keep the existing seams and zipper” gives you a change you can inspect.
Can I draw a red circle around the target?
The workspace currently locates edits through a reference image and text. It has no separate drawing or mask control. For a jacket, say which garment, color and nearby seam identify it. For a vase, specify its position and what it touches. A red circle drawn into the source image can become part of the reference. Keep an unmarked original and describe the location in words for the main edit.
If the target is tiny, try a separate crop for inspection or a second reference that helps locate it. A crop changes the composition that the model sees. If you need the full composition, attach the complete image as @Image1 and the crop as @Image2. Say that the crop is only for locating the detail. Check the result for unwanted framing changes.
What to do when the second edit changes the face
Return to the original portrait if the latest output has started to drift. Use the accepted result as a comparison, then request the next change in one sentence. For a color study, make each candidate from the same source. Blue, ochre and charcoal are easier to compare if every version starts from the olive jacket.
For a client image where the face must stay pixel-identical, plan a conventional layer edit or use a mask and composite the changed region back into the original in an editor. A preservation instruction guides generation. Confirm the protected area before delivering the file. The change-one-thing edit guide explains the comparison method with earlier model examples.
2. Render a sketch and keep the composition
A line sketch can answer questions that a paragraph leaves open. Show the large shapes and contact points. For a small gallery entrance, draw the door, sign panel and bench, mark the ground line and add a few perspective guides. Leave surface finishes to the text brief.
Use Edit Image with the sketch as the first reference. Match the sketch's ratio. Decide which geometry the result must keep and which details the model may fill in.
Use @Image1 as the layout for a street-level concept render.
Keep the doorway centered, the rectangular sign panel above it, the bench at the viewer's right, and the existing ground line and viewpoint.
Use warm plaster, oiled wood and soft overcast light. Keep the sign panel blank.
Add no extra doors, windows or furniture. Preserve the proportions in the sketch.
Review the large shapes before the material finish. Compare the door width to the wall and follow the floor line toward the vanishing point. If the bench moved, repair the composition before asking for richer wood grain. If a sketch line was meant as a construction guide, identify it in the prompt so it does not turn into a permanent design detail.
For buildings, packaging or parts that must fit, keep a separate drawing with verified dimensions. A pleasing rendering can inform a design conversation; check measurements in the source specification before handing it to someone who will build from it.
3. Use a generated UI image to discuss layout
Suppose a neighborhood library needs a screen that lists available seed packets. If you have a wireframe, choose Edit Image, upload it and prepend “Use @Image1 as the layout reference” to the prompt below. From a blank slate, use Text to Image and describe the required elements. Supply the real text for any labels you want to inspect. Leave room for longer names.
Create one straight-on mobile interface mockup for a neighborhood seed library.
At the top show the title "Seed Library" and a search field.
Below it show category chips, then three cards with seed name and availability.
Use a neutral background, dark teal accents, clear spacing and a bottom action labeled "Reserve".
Show only the screen artwork. Keep text large enough to inspect. No device frame or extra screens.
Review the output at the width where the screen will be built. Ask whether the action reads before the decorative details. Verify the words and compare the search position with your wireframe. Write down the states the image cannot express, such as empty results, sold-out items, long labels, keyboard focus and errors.
A PNG mockup gives a developer a reference image. Share the text content, spacing choices and behavior requirements separately. Ask the developer to implement the screen, then inspect the rendered page on a real phone. A generated screenshot can inform the visual direction even when the exact typography and spacing need rebuilding.
4. Translate image text while keeping the diagram readable
Use a short diagram with clear label boundaries. A three-step planting card is a good first exercise: soak the seeds, sow them, then water them. Write the translations yourself or review them before asking the image model to place them. Keep numbers and units in a separate checklist.
Edit only the three labels in @Image1.
Replace "SOAK" with "浸泡", "SOW" with "播种", and "WATER" with "浇水".
Keep each replacement beside its original illustration and preserve the order, arrow direction, colors and spacing.
Retain all measurements and numbers exactly. Fit the text without covering any line or symbol.
Check each label against your map and trace the arrows in order. Longer words can crowd a box or cover a connector. If a label fails, try changing only that block. If the diagram carries technical, safety or instructional information, verify the wording and the numerical details against the underlying source. Use editable text layers for the final layout when a single incorrect symbol would matter.
5. Make a new SVG icon from a text brief
Start a fresh Text to Image request in the GPT Image 2.6 workspace. Select SVG and 1K. The current workflow uses text to create a new vector asset. Upload a photo in Edit Image and choose PNG if the task is to preserve an existing object's appearance. To turn an existing photo into paths, plan a separate vector tracing step.
Create a square SVG icon for a neighborhood seed library.
Show a simple open seed packet with a two-leaf sprout above it.
Use one dark teal stroke color, round line caps and a clear silhouette.
Center it with generous padding. Keep the paths simple. No shadows, gradients, lettering or background rectangle.
Download the result and open it in a vector editor or text editor. Check the actual file before putting it into a design system.
- Confirm the format. Look for an SVG document with a viewBox and vector shapes or paths. An image preview alone does not show how the asset was made.
- Inspect the silhouette at use size. Shrink the icon to the size of a toolbar control. If the seed packet and sprout merge into a blob, simplify the drawing.
- Try a small edit. Select a shape, change the stroke or fill, and resize it. Check for unexpected clipping, embedded bitmap elements and unnecessary detail.
- Fit the icon set. Compare stroke width, corner radius, padding and optical size against nearby icons. Clean up the file and review it before embedding on a site.
One good icon is a useful style target. Write down what makes it work before generating more. If a second icon comes back with a different stroke weight or viewBox, fix the discrepancy in the editor. The file is easier to maintain when each shape has a purpose.
Diagnose the next change
| Problem | First correction |
|---|---|
| The new color is right, but the face changed | Restart from the original and specify only the fabric color |
| The whole image became warmer | Preserve the source light and white balance in the request |
| The sketch view shifted | Name the viewpoint and fixed positions before adding material details |
| Text overlaps an arrow | Edit one label or place the approved wording in a layout editor |
| The icon is cluttered at small size | Remove one detail and inspect it at the final size |
| You cannot select the shape to recolor it | Inspect the actual SVG structure and simplify or redraw the relevant part |
Save the first useful file and the last usable source. When an edit has already met its brief, a broad request to improve the whole picture can undo the parts you approved.
FAQ
Can GPT Image 2.6 change clothes without changing a face?
Describe one change, keep a clean reference and compare the eyes, expression, hairline and nearby fabric edges. If the face must match exactly, verify protected pixels or composite only the garment edit back onto the original.
Can I use an AI-generated UI mockup as a working prototype?
It is a visual reference. Define the layout, interactions, accessibility and responsive states separately, then build and test them in the actual interface.
Can I upload a reference and export it as SVG here?
The current SVG route starts from text and uses 1K. Use Edit Image and PNG for reference-guided corrections. A reference-based vector conversion requires tracing or rebuilding the artwork as paths.
Can I make the edited picture move afterward?
Save a clean still you are happy with. Use it as the reference for a separate GIF request with one small motion. The GIF workflow covers loop settings and what to inspect between frames.
Choose one task and name the part that must survive it. A collar edge, a door opening, a diagram label and a vector path each give you something concrete to approve before the image moves into the next stage.
More Posts

GPT Image 2.6 GIF Tutorial: Animate a Photo or Character
Make a GIF from a photo with GPT Image 2.6. Set frame size and speed, keep your character recognizable, and check the loop before sharing.


How to Use GPT Image 2.6: Features, Settings & Prompts
How to use GPT Image 2.6 for image generation and photo editing: choose settings, write precise prompts, check results, and avoid common mistakes.

GPT Image 2.6 Use Cases: 6 Ecommerce Workflows
GPT Image 2.6 use cases for small ecommerce teams: six practical image workflows with reference briefs, copy-ready prompts, checks, and stopping rules.